 Bike Stop winter special (1997-11-11)
It started off with a really funky shaped frame. Apparently it came from a lot of 750 Bridgestone frames. I've seen a couple others on the streets.
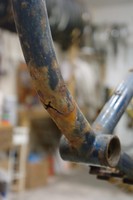
It started to show signs of failure in winter 2008 when a rust hole developped in the downtube, right in line with the spray off the front wheel.
It was replaced in November 2008 just as the downtube was about to fail. The towntube was held together by about a 1cm strip of metal on the top side of the downtube. The rust cracks had gone 3/4 of the way around the tube.
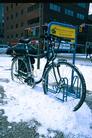
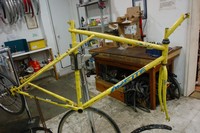
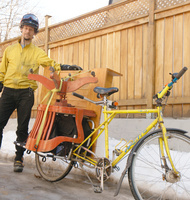
It was replaced with a bright yellow GT. That frame is also a bit distinctive.
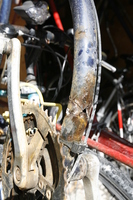
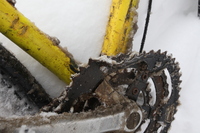
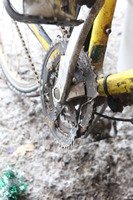
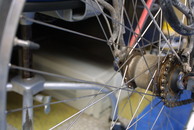
Shortly after the new frame, the chain was a bit sloppy and caught on the large chainring, bending it quite out of shape, but since there is no front derailleur and I was only using the middle chainring, there was no technical reason to do anything about it.
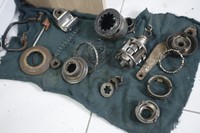
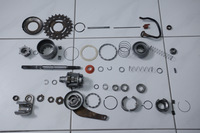
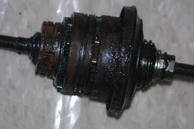
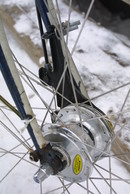
After ripping apart the rear hub *twice* and doing a thorough cleaning and re-lube, I discovered it was the bottom bracket that was crunchy and not the hub.
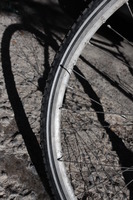
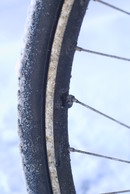
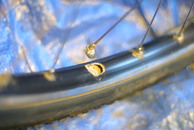
And a few days later the front wheel fails on several spoke nipples.
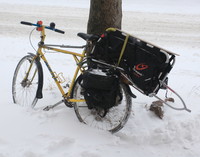
A year later it was Xtracycled
|
|
|
|
|
|
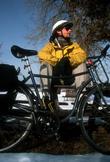
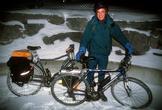
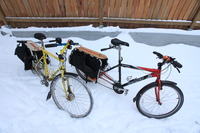
| A rust hole developping... | Here it is just about to fail. | GT replacement frame from Re-Cycles stock | Xtracycled | Here it is with its non-winterized mate. | winter furniture hauling |
|
|
|
|
|
| chainwheel bent | chainwheel bent | Sachs Super-7 hub clean and lube | Sachs Super-7 hub clean and lube | wheel multiple nipple failure |
 It got two wheel replacements in December 2005: The front
needed replacement because it had seen 11(?) winters with only cone
maintenance, but the spokes were starting to creak. I took the
opportunity to convert the front to a dynamo hub with a roller brake.
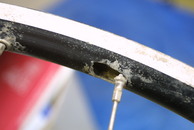
The back wheel got trashed in December 2004, but was already starting to
pull through the rim in several places after only 3-4 months of actual
riding. This time, I built the new back wheel myself.
It got two wheel replacements in December 2005: The front
needed replacement because it had seen 11(?) winters with only cone
maintenance, but the spokes were starting to creak. I took the
opportunity to convert the front to a dynamo hub with a roller brake.
The back wheel got trashed in December 2004, but was already starting to
pull through the rim in several places after only 3-4 months of actual
riding. This time, I built the new back wheel myself.
|
|
|
|
|
| old back | old back and new front | new front | old back | old back |
In 2009, the rear hub got a rebuild several times.
After rebuilding the back wheel after the motorist road rage incident, I was never able to get it to shift properly in the bottom 2 gears, even after having it apart several times.
A:I just got a set about 1.5 months ago. I love them. I was out on the
day we got freezing rain. I had way better accelleration than any car
on that day. I found it easier to ride at the side of the
road where nobody else had driven yet where it was solid ice. I was
getting traction which seemed to be as good on ice with the studded
tyres that was about equivalent to rubber on wet road. They require
about 50km of break-in without hard accelleration or braking. I can't
wait to try them on the canal if it ever freezes... :-( I have not
been too concerned about rolling resistance or cost. I will either
remove them for the summer, or simply not use that bike since it is
pretty specifically designed as a winter bike. It is one of Doug
Gableman's famous Bike Stop Winter Specials with the Sach's Super-7
internal hub with coaster brake. Nice combo with the studded tyres that
will not have a whole lot of trouble stopping in just about any
conditions. So far, I have not noticed any wear on these studs. I find
them exhilarating and just adds to the fun of winter cycling.
(note: new SRAM
9-speed internal with coaster brake)
A friend of mine was in Sweden and he picked up an extra set for me for
about half that price. In Finland they are even cheaper than that.
I was using Nokian
Hakkapeliitta W106 tyres, but after 4 years of service, I can't find
them locally. I'm currently using Schwalbe
Marathon Winter 35-622 tyres.
The Schwalbe are available through Juergen at RideMore.ca, 456 McArthur Ave.
I don't remember the exact price, but it is somewhere around the price
of the snow stud or spike claw listed above. Some debate whether it is
better to do one tyre or both, citing that it is more important to be
able to stop and/or control the front tyre than the rear, but the rear
is just as important IMHO since if you slide out that rear tyre either
from accelleration or braking, the front won't really help you anymore.
Just do both.
I've also got the 26" and 20" versions for other bikes.
There are some pretty extreme studded tyres out there, but you won't
need them for commuting and they will just slow you down and make things
less safe on dry pavement. There are tyres with 4 lines and two lines
of studs. You should be fine with a tyre with 2 lines of studs (around
100 per tyre, rather than 200 for the extreme ones) for commuting.
The jury is still out on the best approach, but some extremes include
using a super wide tyre to float on top of the snow at lower pressure,
or a super skinny tyre at high pressure to cut through it. I've arrived
at a middle ground.
Peter White Cycles in the US has some really good information on
winter bicycle tyres.
You've probably already seen IceBike
site, in particular their winter tyre
page.
Other local sources of winter bicycle tyres include:
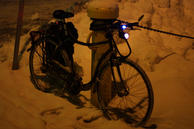
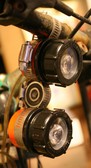
Decent lights are *very* important since most of your commuting will be
done in the dark. I've been using a Shimano HB-NX60 front hub dynamo for a number of
years now and have been extremely pleased. I've made my own head and
tail lights from 18AWG lamp cord, 1.25" compression plumbing drain
fittings, a back cap and the discontinued Luxeon Star/O 1Watt LED. I
use two white LXHL-NWG8 on the front and two red LXHL-ND98 on the back. I never need
batteries and they are visible a kilometer away. More recent designs
have added a 1Farad supercap to make a German standard standlight.
I found a good value in a front dynohub in the Novatek hub from TallTree
Cycles on Richmond Road near Tweedsmuir for $50 (now $65, 2011-06-08).
I plan to get more. I got 4 Shimano
dynohubs installed on a number of our other bikes.
A: Some Planet Bike mudguards (many people call them fenders) have
built-in mud flaps, but they aren't that big or effective. I have seen
a few commercial mudflaps, but not that often. They are pretty easy to
make.
They get installed on the back of each mudguard.
The one on the front wheel will protect your chain primarily in winter
and will make a big difference to maintenance of the chain, bottom
bracket, frame and pedals. It will also keep your feet/boots/pants
*much* cleaner. I have had such good success with a front mudflap that
I frequently don't bother with waterproof booties anymore because it is
so effective. Of course, it will also keep the front of your panniers
much cleaner as well.
As for the back mud flap, it is also worth considering. A full back
mudguard can go a long way to keeping things much cleaner, starting with
the stripe up your back. After that, it can keep your panniers much
cleaner and anyone following. Adding a mud flap to the back of the back
mudguard can keep anyone following even that much cleaner. If
installing just one mud flap, make it the front. Definitely install
both front and rear mudguards though, using a nice wide one that is
wider than the tyre and give yourself lots of clearance between the tyre
tread and the inside of the mudguard so that slush doesn't collect and
clog the wheel against the mudguard.
As for how to make them... The material can be any number of types of
plastics. I've used something cut from a javex or windshield washer
anti-freeze jug or that type of flexible plastic. I've also used
neoprene from a floor-protecting ice skate mat. You want something that
won't blow away in the wind, but also something that will give a bit if
it catches a boot or a curb. Cut out a piece that is maybe 4-5" wide
and a good 9-10" long, tapering it up a bit at the top where it meets
the mudguard and rounded a bit at the bottom to not look quite so square
and sharp. You want it to come within a few inches of the ground, so
eyeball a line from the front wheel road contact patch to the bottom of
your pedal stroke to make sure it goes down far enough to protect your
footwear. Bolt or rivet it in place, being careful not to split
the end of the mudguard when drilling or punching holes to install it.
If you can curve it to fit the mudguard, it will hold its shape better
due to the vertical curvature.
I hope this description is helpful enough to get started.
Tyres
Q: How are people making out with their studded tires? I can appreciate
the traction advantage on icy streets, but how fast will the studs
wear down on our (so far) mainly clear roads? 80 bucks is a lot of
money (to me) for tires that might only be useful for a few months of
riding... I guess it depends on the streets one is using for getting
around. I live between Bank and Kent, which are always cleared
quickly, so road conditions haven't been a big deal for me. Of
course, others might not worry about the cost and added rolling
resistance if it makes their commuting safer.
Tyres aren't the only place to pay attention for winter cycling.
Bike
I found that using a second bicycle only for winter to be a good
investment in time and money. It will save any investment you have made
in non-salt season bicycles and will save you changing equipment around
each fall and spring. I found I needed an upright seating position to
be able to maintain my balance should I hit ice. I discovered this
after spending two months "mustering" (herding) sheep on a 604,000 acre
sheep station in western Australia on a motorcycle in deep sand. Once I
got home again, I realized I had learned a transferrable skill of riding
a bicycle in snow.
Lights
 LED lights
(previous bike lighting writeup)
Clothing
Clothing that I've found works well is a combination of cross-country
and downhill skiing. Using good gloves, socks, *sealed cleat*
cycling shoes, balaclava (no need for separate eye, nose, mouth holes)
to keep the extremities warm and protected from wind. The sealed cleat
shoes are important to prevent the slush coming up through the cleat
(yes, I use SPDs on my winter bike, finding them safer than the
alternatives, since I can get the shoe unclipped and onto the ground
before the bike hits the ground if I hit a patch of ice). For your
core, you want layers you can peel as you warm up since you can generate
a lot of heat even at -40C.
Mudguards and Mudflaps
Q: You mentioned mud flaps as being important for winter cycling. I have
fenders but do find a lot of crap from the road lands on my panier bags
and boots. Do these mud flaps get installed on the back fender of each
wheel? Where would I get them?
Pedals
It is equipped with single-sided metal SPD pedals with a platform on the
other side. I've had the reaction from people that I am nuts for using
SPDs in the winter. I've been using SPDs for over 2 decades now and feel
much more comfortable with them than with plain pedals. I feel much
more secure, one with the bike, and don't risk my feet slipping off. If
I hit ice, my feet are unclipped and on the ground before the bike hits
the ground. As for SPD shoes, I found only one pair that actually had a
sealed cleat so that no slush and water could come up through the sole
and soak my feet or suck the heat out of them. They also have a
neoprene upper and are reasonably well insulated. They were the Lake
MXZ-300 that I got through MEC mail order. Apparently there are other
makes out there now and the prices have come down.
Other resources
Acknowledgements
Thank you to
Mark Rehder,
Alex DeVries and
Stephan Bussman
for provoking this writeup.
Thanks also to Pete
Hickey for being a source of enlightenment and to Graydon Patterson for
being an excellent role model.
(C) 2002 Richard Guy Briggs Web
Page last updated by
Richard Guy Briggs
Wed Nov 27 14:26:59 EST 2013